Main window
Connecting from a device
Running an app
Creating your own app
Application file structure
Live editing
Using Cordova/PhoneGap
JavaScript Tools
Restore settings and uninstalling
Source code
Evothings Workbench
The Evothings Workbench is a desktop application for running apps on mobile devices. For an overview of how to get started, see the Quick Start section of the main documentation page.
The Workbench has three windows:
- The main window that handles connect codes and lists projects (apps) you can run on mobile devices.
- The JavaScript Tools window, where you can interactively run code on connected devices and view log output.
- The Feedback section, where your input is superimportant for the evolution of Evothings Studio.
To run an app on a connected device, press the "Run" button. This will make the local web server used by the Workbench set its base directory to the folder where the main HTML file of the project is located.
Edit the source code of your apps using your favourite text editor and web development tools. Each time you save a file in the currently running project, it will automatically reload it on connected devices. This also works like a charm when you save images and other resources.
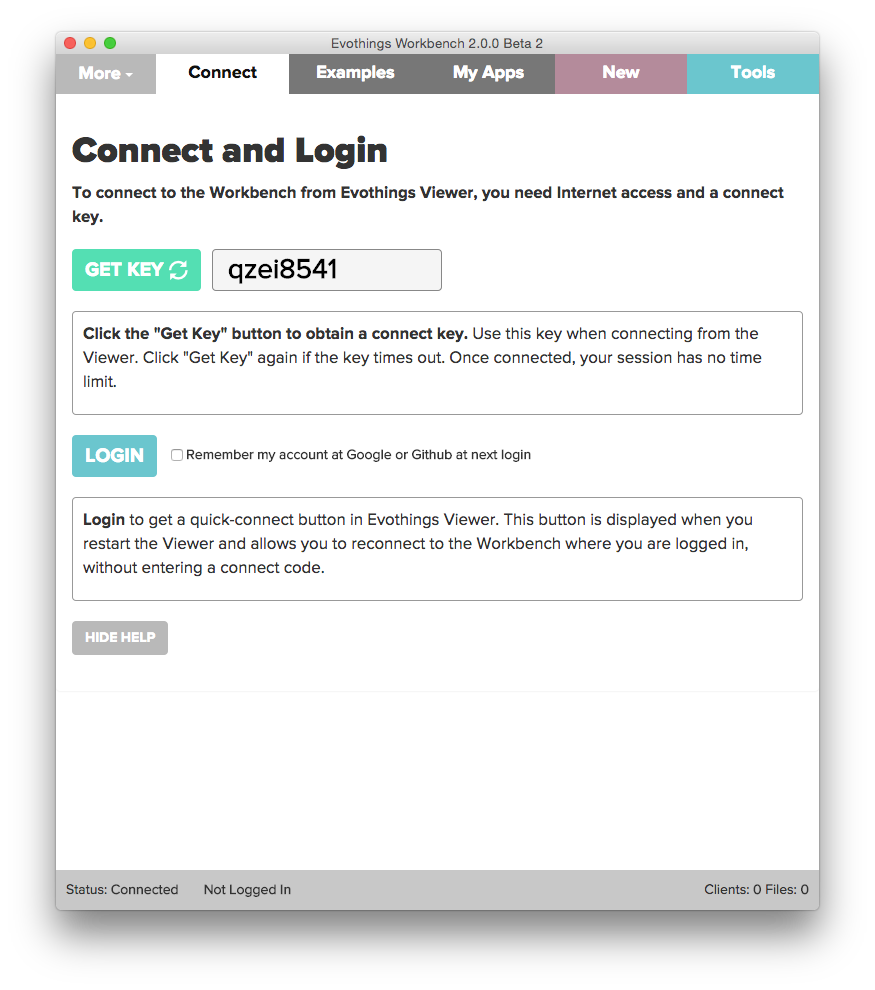
Main window
The main window has three tabs:
- Connect. First tab is for connecting to the Evothings Cloud Server. Here you get a connect key for use in the Viewer app.
- Examples. Second tab displays a list of example apps.
- My Apps. Third tab is for your own apps.
When you click the "Run" button, that project will launch on connected devices.
Click the "Code" button to display the files in the project. From the file list, you can open files in any editor you have installed on your machine.
Connecting from a mobile device
Before you can run an app on a mobile phone or tablet, you need to connect it to the Workbench. If you are not connected, nothing will display on the device. You can connect from one or many devices concurrently.
Use Evothings Viewer (available on Google Play and the Apple App Store) to connect to the Workbench and run apps.
Enter the connect code obtained in the "Connect" tab in the Viewer app, and press the "Connect" button in the app. If the code times out you can easily get a new code from the Workbench. Once connected, there is no time out on the session.
Running an app
To run one of the Evothings example apps, make sure the Viewer is connected to the Workbench, then click the "Run" button on the app you wish to run.
Some of the example apps require that you change settings in the source code for them to work properly. You cannot edit the code of the example apps directly, you need to make a copy first. Click the "Copy" button to do this. It will create a copy of the app under "My Apps". The click "Code" to open a system file browser showing the application files.
Creating your own app
To create your own app in "My Apps" you have three options:
- Click the "New" button in the main menu bar.
- Click the "Copy" button on an example app.
- Drag and drop an .html file to the Workbench window.
How to use the tab "My Apps":
- When clicking "Run" the app is launched in connected mobile devices.
- You can remove app entries listed under "My Apps" by clicking the small close (x) icon. This will not remove files on disk. To add back a removed app, drag and drop the index.html file of the app to the Workbench window.
- Sort the list of apps using drag and drop (note that this is disabled in the "Examples" tab).
- To change the name of the app displayed in the list, edit the <title> tag in file index.html.
- You can change the icon shown in the list by replacing the file app-icon.png in the folder of the app.
- Changes to the app title or the icon will be displayed when you Run of reload the app.
Application file structure
An Evothings app is just a standard web page. Any web page can be launched as an app in Evothings Viewer.
When you create an app using the "New" or "Copy" button, you will also get an icon displayed in the list of apps, and a settings file called evothings.json. If you add an app using drag and drop, the file evothings.json will be created for you first time you run the app.
To make use of the Apache Cordova framework, include the file "cordova.js" in index.html. Check out the example apps for how this is done. "Cordova Accelerometer" is a good example to start with.
The main HTML file of the app is named "index.html" by convention. Evothings example apps use this naming convention, as do Cordova applications. This file is the entry point of your mobile application. You may name the main HTML file of your app anything you like. Just drag and drop the file onto the Workbench window, and it is added to "My Apps". It is however convenient to follow the convention of using "index.html" for easy compatibility with Cordova and other frameworks.
Live editing
When "Run" is clicked on an app in "My Apps", that app becomes the active app. The files in the app's folder are monitored, and the app is reloaded when any file is updated.
Currently up to three levels of subdirectories are monitored. The number of levels scanned can be configured in the Settings dialog found under the "More" menu.
Here is how to live edit an app:
- Click "Run" to make your app the active app.
- Click the "Code" button. This opens a system file browser for the application files.
- Open the file you wish to edit, for example "index.html", in a text editor. Any text editor or IDE should work.
- Change something in the code. For instance, change the <h1> heading to:
<h1>I am alive!</h1>
- Save the file. The changes you made should be instantly displayed on connected mobile devices.
Using Cordova or PhoneGap
Evothings Studio works great when developing apps with Apache Cordova (or Adobe PhoneGap). You can skip the entire build step and get a fast workflow with quick turn-around times.
The Cordova Guide contains a step by step description of How to use Evothings Studio with a Cordova application.
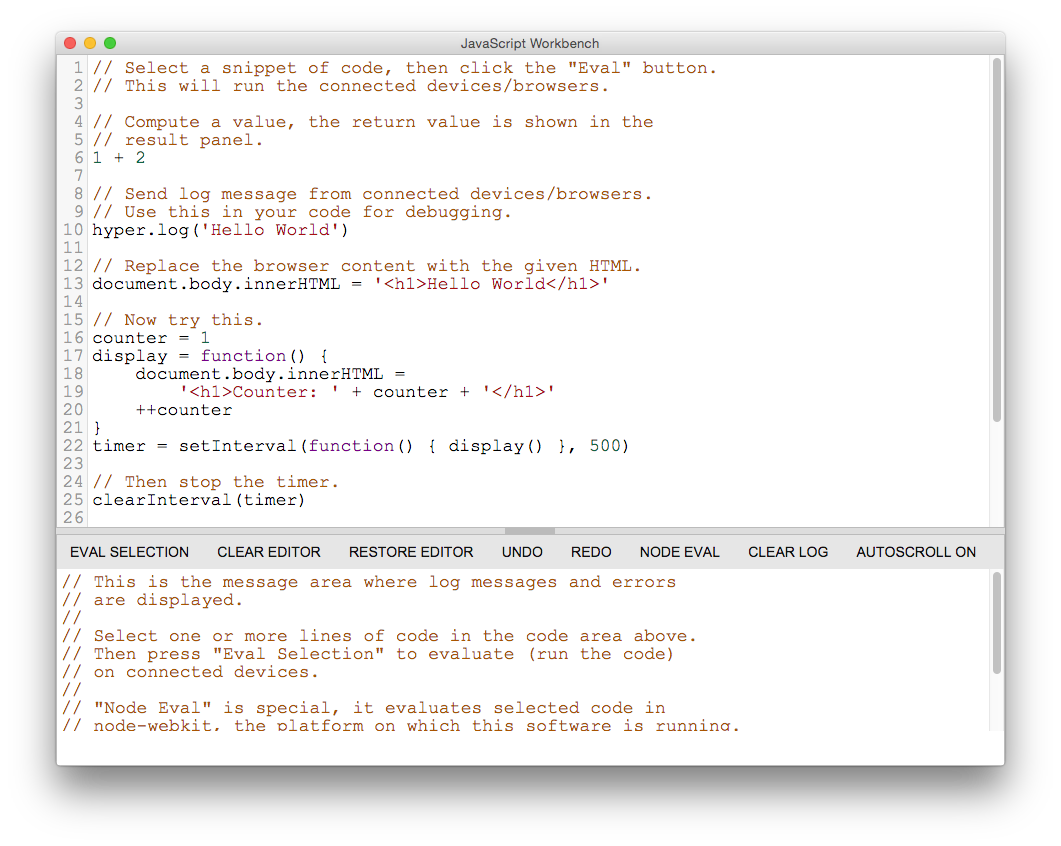
JavaScript Tools
Clicking the "Tools" button opens the JavaScript Tools window. This window has two parts; a JavaScript coding space and a log view.
In the coding space, you can evaluate JavaScript code snippets interactively on connected devices. Just select the code you wish to run, and press the "Eval Selection" button. The selected code is sent to connected devices and evaluated. The return value is displayed in the log view in the bottom panel.
To display log messages, use the hyper.log() function. The log message is displayed in the lov view. Exemple:
hyper.log('Hello World')
By using hyper.log() in your code, you can output debug information from connected devices. If you are using console.log() in your existing code base, you can easily create an alias to send the output to the log view. Just include this line first thing in your page:
<script>console.log = hyper.log</script>
Button "Eval Selection" evaluates the selected JavaScript code on conencted mobile devices.
Button "Node Eval" is a special, it evaluates the selected JavaScript code in the Workbench itself. The Workbench is written in nw.js and node.js, and being able to evaluate code in this context is useful for testering service side code, scripting the Workbench, etc.
The Tools window very is useful for experimenting with code snippets, inspect and modify the state of the running program, and for debugging and debug logging.
Restore settings and uninstalling
Here is who to restore Workbench settings and how to remove Evothings Studio from your computer.
Clearing all settings
Clearing the Workbench settings is useful if you wish to restore original default values.
Evothings Workbench is written in nw.js. Settings are stored in localStorage. To clear all settings, open the Tools window, enter and select the following code and click the "Node Eval" button:
var gui = require('nw.gui');
localStorage.clear();
gui.App.quit();
The above code will clear localStorage and quit the Workbench without saving any settings.
The "Node Eval" button evaluates the selected code in the nw.js environment in the Workbench itself (this is also a useful and fun way to experiment with code snippets and for scripting the Workbench).
Clearing all Workbench data
Another way to clear settings is to delete the settings folder for Evothings Workbench.
The location of this folder can be found by evaluating the following code in the Tools Window using "Node Eval", the result is displayed in the bottom panel:
var gui = require('nw.gui');
hyper.log(gui.App.dataPath);
Quit the Workbench and delete this folder. When you start the workbench again you will have a clean slate.
If it does not work to obtain the folder location using the above code snippet, the locations are as follows (replace {username} with your actual user name):
OS X:
/Users/{username}/Library/Application Support/evothings-studio
Windows:
C:\Users\{username}\AppData\Local\evothings-studio
Linux:
~/.config/evothings-studio
How to uninstall Evothings Studio
To completely remove Evothings Workbench from your computer, delete the settings folder as described above and delete the unzipped Evothings Studio folder.
If you wish to remove your app files, you also need to delete the folder(s) where they are stored. The default location on all platforms is (where {userhome} is the user home folder):
{userhome}/EvothingsStudio/MyApps
You can find the location of this folder in the Workbench Settings dialog, open it by selecting the menu More/Settings.
Source code
See the Source Code section of the main documentation page.